|
Dubbed-off
to zero rake Slow Spiral-Polished Flutes |
Cross-section of drill used in drilling steel. This will not work for drilling Plexiglass, due to the fact that it digs in, causing cracks. |
|
|
Windshield and window trimming:
Mark the windshield for trimming with masking tape or a china marking pencil. Trimming is best done with a band saw using a 1/4 inch blade with 14 or more teeth to the inch. The windshield and edges should be well supported during the sawing and for any other work on the windshield. Clamp a wood block up against the saw blade so that in sawing it is not necessary to reset the windshield or have it come in contact with the band saw work table, or if desired mask off the work table so that the plastic will not be scratched during sawing. After sawing it is important that the edge be smoothed as this lessens the tendency towards edge cracking and effects the service life of the windshield, also it lessens the risk of cracking during installation. Smoothing or edge finishing is best done with a small 11/2 inch diameter drum type sander that can be used with 1/4 inch drill motor. For most effective edge finishing the grinding should be done in the same plane as the plastic surface which is also the easiest way to sand when using a drum type sander. Edge finishing may also be done well with the round face of a medium cut bastard file and some double 0 sandpaper.We do not recommend that trimming be done with a jig saw or hand saw. If trimming is only minor and it must be done by hand then use a coping saw with what is ordinarily called a bone cutting blade, (about 30 teeth per inch), it may work best by putting the blade in backwards that is with the teeth pointing towards the handle. Extreme care must be taken in that the teeth are not allowed to catch or hang up in the material and cause the starting of a crack. Keep the plastic well supported during sawing, do not allow the sawed material to pinch the saw blade.
Sawing flat sheet:
In sawing flat sheet as for windows etc., this sawing can be done very easily on an ordinary table or circular saw, only cross cut or finishing blades should be used. Saws should turn at least the speed as recommended for lumber. Smoothest cuts; will be obtained by keeping the blade adjusted to a low level and by not rushing the work through the Saw.
Drilling holes in Plexiglass:
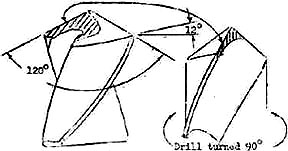
The drilling of holes in Plexiglass seems to be the big bugaboo among many aircraft mechanics. The principal difficulty lies in that drills as sharpened for steel are used, it is near impossible to drill a hole in Plexiglass without cracking using a drill that has been sharpened for drilling steel and especially so if the hole is much larger than 3/16 diameter. Drill sharpening for Plexiglass is relatively simple, in general take the drill as sharpened for steel and just grind off or dull the cutting edge. The object is to sharpen the drill so that it scrapes its way through the plastic. Sharpen your drill as shown below, try it out on some scrape plastic first.
|
Dubbed-off
to zero rake Slow Spiral-Polished Flutes |
Cross-section of drill used in drilling steel. This will not work for drilling Plexiglass, due to the fact that it digs in, causing cracks. |
|
|
Drilling windshields:
Whenever screws or bolts are used through holes drilled in the Plexiglass as for the securing of an aircraft windshield or window, consideration should be given to the expansion or contraction of the Plexiglass as effected by changes in temperature. Plexiglass expands or contracts with temperature at the rate of 1/16 inch per foot per 100 degrees F. temperature change. For example a line of holes at the top of the windshield 36 inches across using a 1/8 diameter. screw would require that the holes be 5/16 inch in diameter to take care of a temperature spread of 100 degree F.. When holes are drilled with insufficient clearance excessive strain is placed on the windshield and may cause the holes to crack out at high or low temperatures. Excessive strain on Plexiglass windshields shortens their service life and invite cracking and crazing.